
To change the belt on a Shark Navigator, follow these steps: 1. Turn off and unplug the vacuum.
2. Remove the screws that secure the brush roll cover. 3. Lift off the cover and remove the brush roll. 4. Slide the old belt off the motor shaft and brush roll. 5. Slide the new belt onto the motor shaft and brush roll.
6. Reinstall the brush roll, cover, and screws.
Understanding The Shark Navigator Belt
The Shark Navigator Belt is a crucial component of the vacuum cleaner that needs to be changed periodically for optimal performance. This article provides easy-to-follow instructions on how to change the belt on your Shark Navigator, ensuring a thorough and effective cleaning experience.
Introductory Paragraph: Understanding The Shark Navigator Belt
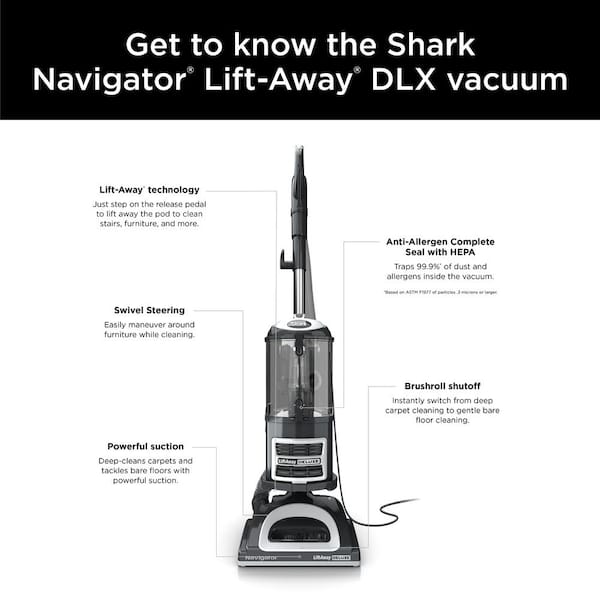
When it comes to keeping your Shark Navigator running smoothly, understanding the role and signs of a worn-out belt is absolutely crucial. The belt is a small yet vital component that drives the brushroll, allowing it to effectively pick up dirt and debris from your floors. In this article, we will delve into the importance of the Shark Navigator belt, the role it plays in maintaining optimal performance, and the signs that indicate it’s time for a replacement.
Role Of The Belt
The belt in your Shark Navigator serves a vital role in ensuring efficient cleaning performance. It connects the motor shaft to the brushroll, providing the necessary power to rotate the bristles and effectively agitate the floor surface. This, in turn, allows the vacuum cleaner to pick up dirt, dust, and debris from carpets and other flooring types with ease. Without a properly functioning belt, your Shark Navigator won’t be able to deliver the deep cleaning power it is known for.
Signs Of A Worn-out Belt
Over time, the belt in your Shark Navigator may wear out due to regular use or other factors. It’s important to be able to identify the signs that indicate a worn-out belt so that you can replace it promptly and prevent any further damage to your vacuum. Here are some common signs to look out for:
- Brushroll not spinning: One of the first indications that your Shark Navigator belt may need replacement is when the brushroll stops spinning or becomes sluggish. This can lead to poor cleaning performance and ineffective suction.
- Burning smell: If you notice a burning smell while operating your Shark Navigator, it could be a sign that the belt is slipping or being worn down. This can happen if the belt is loose or in need of replacement.
- Visible signs of damage: Inspect the belt for any visible signs of wear and tear, such as fraying or stretching. A damaged belt won’t be able to function properly and should be replaced as soon as possible.
- Lack of suction: A worn-out or broken belt can also cause a significant reduction in suction power, making it difficult for your Shark Navigator to pick up dirt and debris effectively. If you notice a decrease in performance, it’s worth checking the condition of the belt.
By paying attention to these signs, you can ensure that your Shark Navigator continues to operate at its best. Now that we’ve covered the role of the belt and signs of a worn-out belt, let’s move on to understanding how to change the belt on your Shark Navigator for seamless cleaning performance.
Preparing For The Belt Change
Changing the belt on your Shark Navigator vacuum cleaner is a straightforward process that can help restore its cleaning efficiency. Before you begin, there are a few steps you should take to ensure a safe and successful belt replacement. In this guide, we will walk you through the necessary tools you’ll need, as well as some essential safety precautions.
Gathering Necessary Tools
Before you dive into the belt replacement process, it’s important to gather all the necessary tools to make the job easier and more efficient. Here are the tools you’ll need:
| Tool | Description |
|---|---|
| Screwdriver | A flat-head or Phillips screwdriver, depending on your specific Shark Navigator model. |
| New Belt | Make sure you have a replacement belt that is compatible with your Shark Navigator model. Check the user manual or the manufacturer’s website for the correct belt size. |
| Clean Cloth | A clean cloth or towel to wipe away any dirt or debris that may have accumulated during the process. |
Safety Precautions
When working with any electrical appliance, it’s crucial to prioritize your safety. Follow these safety precautions to prevent any accidents or injuries:
- Unplug the Vacuum: Before you start the belt change process, always make sure that the vacuum cleaner is unplugged from the power source. This prevents any accidental engagement of the motor while you’re working on it.
- Work in a Well-Lit Area: Find a location with adequate lighting to ensure you can see all the components clearly. This will help you navigate the process with ease and precision.
- Wear Protective Gloves: To protect your hands from any sharp edges or debris, it’s advisable to wear a pair of protective gloves throughout the belt replacement process.
- Follow the User Manual: Each Shark Navigator model may have slightly different instructions for belt replacement. Read the user manual carefully to understand the specific steps you need to take for your particular model.
- Double-Check the Vacuum’s Condition: Before starting the belt replacement, ensure that the vacuum’s power switch is turned off and the cord is safely stored. Also, inspect the vacuum for any visible damage that may require professional assistance.
By gathering the necessary tools and following the safety precautions mentioned above, you’re now ready for a successful belt change on your Shark Navigator vacuum cleaner. In the next section, we will guide you through the step-by-step process of replacing the belt.
Accessing The Belt Compartment
Accessing the belt compartment of your Shark Navigator is an essential step in changing the belt to ensure smooth and efficient vacuum operation. Follow these clear instructions to seamlessly access the belt compartment, enabling you to proceed with replacing the belt with ease.
Locating The Belt Compartment
First, you need to locate the belt compartment on your Shark Navigator. This compartment is usually situated on the underside of the vacuum cleaner, near the brush roller. Make sure to unplug the vacuum before proceeding.
Removing The Necessary Covers
Once you have located the belt compartment, you will need to remove the necessary covers to access the belt. This usually involves removing the brush roller cover and any other covers that may be securing the belt compartment.
Removing The Old Belt
Changing the belt on your Shark Navigator is a simple task that can help restore the suction power of your vacuum cleaner. If you notice that the brush roll is not spinning or the vacuum is not picking up debris as efficiently as before, it might be time to replace the belt. In this section, we will guide you through the steps to remove the old belt, starting with releasing tension.
Releasing Tension
Before you can remove the old belt from your Shark Navigator, you need to release the tension. This ensures that the brush roll is free and easy to work with. Follow these steps to release tension:
- Start by unplugging your Shark Navigator from the power outlet to ensure your safety.
- Lay the vacuum cleaner on its back so that you can access the brush roll easily.
- Locate the plastic cover that protects the brush roll. It is usually secured with screws, so use a screwdriver to remove them.
- Once the cover is removed, you will see the brush roll. Take note of the belt’s position and how it loops around the brush roll and motor shaft.
- Next, locate the belt’s tensioner, which is a small plastic piece that keeps the belt tight. Push or pull the tensioner to release the tension on the belt.
- With the tension released, you can now proceed to slide the belt off the motor shaft.
Sliding The Belt Off The Motor Shaft
Now that you have released the tension on the belt, you can easily slide it off the motor shaft. Follow these steps to complete the process:
- Gently pull on one side of the belt to detach it from the brush roll. Take your time and ensure you don’t damage the belt or other components.
- Once one side of the belt is off the brush roll, proceed to slide it off the motor shaft. You may need to apply slight pressure and wiggle the belt if it feels stuck.
- Make sure to remove the belt completely and set it aside. You can now proceed to install the new belt on your Shark Navigator.
By following these simple steps, you will have successfully removed the old belt from your Shark Navigator. This allows you to move on to the next step of installing a new belt, which will help improve the performance of your vacuum cleaner. Stay tuned for the next section where we will guide you through the process of installing a new belt on your Shark Navigator.
Installing The New Belt
Learn how to easily change the belt on your Shark Navigator vacuum cleaner. With step-by-step instructions, this guide will help you install the new belt in no time.
Once you have successfully removed the old, worn-out belt from your Shark Navigator, it’s time to install the new belt. This step-by-step guide will walk you through the process of placing the belt on the motor shaft, applying tension, and securing it in place. By following these instructions, you’ll have your Shark Navigator up and running smoothly in no time!
Placing The Belt On The Motor Shaft
To begin installing the new belt, locate the motor shaft on your Shark Navigator. This can typically be found at the base of the vacuum’s brush roll. Take your new belt and position it around the motor shaft, ensuring that it sits snugly.
Applying Tension And Securing The Belt
Once the belt is positioned correctly on the motor shaft, it’s time to apply tension and secure it in place. To do this, gently pull on the belt and carefully slip it over the brush roll. Make sure the belt is aligned properly and that it sits in the grooves of the brush roll. To ensure the belt is securely fastened, give it a gentle tug to make sure it has adequate tension. A properly tensioned belt will help drive the brush roll effectively, resulting in optimal performance of your Shark Navigator. Note: If you are uncertain about the correct tension, refer to your Shark Navigator’s user manual for specific instructions. Once you are confident that the belt is securely in place and properly tensioned, replace any covers or plates that were removed during the belt replacement process. Double-check that all components are correctly reassembled and tightly secured. Congratulations! You’ve successfully installed a new belt on your Shark Navigator. With a properly functioning belt, your vacuum should now be able to tackle dirt and debris with ease, ensuring a clean and fresh environment in your home. Remember to regularly inspect and replace the belt when necessary to maintain the optimal performance of your Shark Navigator.
Reassembling The Vacuum
After successfully replacing the belt on your Shark Navigator, it’s time to reassemble the vacuum to ensure it operates efficiently. Reassembling the vacuum is a crucial step in the process of changing the belt, and it requires attention to detail. Here’s how to properly reassemble your Shark Navigator.
Replacing Covers
Start by carefully placing the covers back onto the vacuum. Align the covers properly to ensure they fit securely. Make sure to align the tabs and slots for a snug fit. Once in place, use a screwdriver to reattach the screws firmly. Tighten the screws evenly to prevent any misalignment or gaps.
Ensuring Proper Alignment
Check the alignment of the covers to guarantee they are correctly positioned. Ensure there are no gaps or loose areas. Proper alignment is essential for the efficient operation of the vacuum. Inspect the area around the belt to confirm it’s properly aligned within the housing.
Testing The New Belt
Learn how to easily change the belt on your Shark Navigator vacuum cleaner with these simple steps. Testing the new belt is a smooth process that helps ensure optimal performance for your machine. Follow the instructions to seamlessly replace the belt and keep your vacuum in top condition.
Ensuring Proper Operation
Once you have successfully changed the belt on your Shark Navigator vacuum cleaner, it is important to ensure that the new belt is functioning properly. By following these steps, you can ensure that your vacuum is operating at its best:
- Test the suction: Turn on the vacuum and run it over a clean surface, such as a carpet or rug. Make sure that the suction is strong and effective in picking up dirt and debris. If you notice a decrease in suction power, double-check the belt to ensure it is in the correct position.
- Check the brushroll rotation: Observe the brushroll to ensure it is rotating smoothly. If it seems to be stuck or not rotating at all, turn off the vacuum and inspect the belt. It could be wrapped around the brushroll or damaged, requiring further adjustment or replacement.
- Test the maneuverability: Push the vacuum cleaner to see how easily it moves across different surfaces. A properly functioning belt should allow the vacuum to glide smoothly, making it easier for you to clean your floors.
- Take note of any unusual odors: While the new belt may emit a slight rubbery smell initially, any strong or unpleasant odors could indicate a problem. If you detect unusual smells, turn off the vacuum and inspect the belt and brushroll for any signs of damage or excessive wear.
Listening For Unusual Noises
When testing the new belt on your Shark Navigator vacuum, it is important to listen for any unusual noises that could indicate a potential issue. Here are a few things to keep in mind:
- Listen for squeaking or squealing: A high-pitched noise could be a sign that the belt is misaligned or not properly tensioned. In this case, check the belt position and ensure it is properly tightened to avoid any further damage.
- Pay attention to any grinding or rattling noises: These noises might suggest that the brushroll is not rotating smoothly or that there is an obstruction affecting its performance. Inspect the brushroll for any debris or blockages that could be causing the unusual sounds.
- Be aware of any clicking or thumping sounds: These sounds could indicate that the belt is slipping or that the brushroll is not properly secured in place. If you experience this issue, double-check the belt tension and make sure the brushroll is firmly attached.
By testing the new belt on your Shark Navigator vacuum cleaner and paying attention to any signs of improper operation or unusual noises, you can ensure that your vacuum is working efficiently. Remember to regularly inspect and maintain your vacuum to keep it in optimal condition and prolong its lifespan.
Troubleshooting
Learn how to easily change the belt on your Shark Navigator vacuum cleaner with these simple troubleshooting steps. Keep your vacuum running smoothly and efficiently by following this quick DIY process. Say goodbye to issues with your belt and enjoy cleaner floors in no time.
Common Issues And Solutions
If you own a Shark Navigator vacuum cleaner and are facing issues with the belt, you are not alone. Fortunately, most belt-related problems can be easily resolved with a few troubleshooting steps. Here are some common issues you may encounter while changing the belt on your Shark Navigator and their simple solutions: 1. The belt keeps slipping off: One common issue is the belt slipping off the brush roll. This can happen if the belt is not properly aligned or if it is worn out. To fix this, ensure the belt is placed correctly on the brush roll and confirm it is the correct size for your specific model. If the belt is damaged or worn out, replace it with a new one. 2. The brush roll is not spinning: If your Shark Navigator’s brush roll is not spinning, it could be due to a loose or broken belt. Check if the belt is intact and properly tensioned. If it appears loose or damaged, replace it with a new one. Additionally, make sure there are no obstructions or debris that could be preventing the brush roll from spinning freely. 3. The motor is making unusual noises: Unusual noises coming from the motor could indicate a problem with the belt. Turn off the vacuum cleaner and unplug it from the power source. Check if the belt is worn out, loose, or damaged. If so, replace it to eliminate the noise. Also, inspect the brush roll for any debris or tangled hair that could be causing the noise.

When To Seek Professional Help
While most issues with changing the belt on a Shark Navigator can be resolved through troubleshooting, there are some situations where professional assistance may be necessary. Consider seeking professional help in the following cases: 1. Difficulty in accessing or removing the belt: If you are having trouble accessing the belt or removing the components required for belt replacement, it is best to consult a professional. They have the expertise and tools needed to disassemble and reassemble the vacuum cleaner properly. 2. Repeated belt failures: If you find that the belt keeps breaking or slipping off despite following the correct installation process, it could indicate a more significant underlying issue. A professional technician will be able to diagnose the problem and provide an appropriate solution. Remember, regular maintenance and proper handling of your Shark Navigator can help prevent belt-related issues. By following the troubleshooting steps outlined above, you can easily address most common problems. However, if you encounter any difficulties or the issues persist, it is advisable to seek the assistance of a qualified professional.
Maintenance Tips
When it comes to maintaining your Shark Navigator, regular checks and cleaning of the belt are essential. Proper maintenance can help ensure the longevity and efficient performance of your vacuum cleaner. Here are some valuable maintenance tips to consider for changing the belt on your Shark Navigator.
Frequency Of Belt Checks
It is recommended to check the condition of the belt on your Shark Navigator every 6 months. However, if you notice a decrease in the vacuum’s performance or if the brush roll stops spinning, it’s crucial to inspect the belt promptly. Regular checks help in identifying any signs of wear and tear, allowing for timely replacement to avoid further damage to the vacuum cleaner.
Cleaning And Inspection Recommendations
To maintain the optimal functionality of the belt, it’s vital to keep it clean and free from debris. Periodically inspect the belt for any accumulation of dirt, hair, or other obstructions that may affect its performance. Additionally, ensure that the brush roll is free from any entangled fibers or obstructions that could cause strain on the belt.
Frequently Asked Questions On How To Change Belt On Shark Navigator
How Do I Change The Belt On A Shark Navigator Vacuum?
To change the belt on a Shark Navigator vacuum, follow these steps: 1. Turn off and unplug the vacuum. 2. Flip the vacuum over and locate the brush roll cover. 3. Remove the screws or clips holding the cover in place.
4. Take out the old belt and replace it with a new one. 5. Put the cover back on and secure it with screws or clips. That’s it!
How Do You Change The Roller On A Shark Navigator Brush?
To change the roller on a Shark Navigator brush, turn the power off. Remove the brush roll cover and the brush roll. Replace with the new roller and reassemble the cover. Restart the vacuum to check if it’s working properly.
Why Is My Shark Navigator Vacuum Not Spinning?
A possible cause for your Shark Navigator vacuum not spinning could be a clogged roller brush or a malfunctioning belt. Check and clean the brush and ensure the belt is tightly attached. If the issue persists, contact Shark customer service for further assistance.
Does Shark Lift Away Have A Belt?
No, the Shark Lift Away vacuum models do not have a belt.
How Often Should I Change The Belt On My Shark Navigator?
It is recommended to change the belt on your Shark Navigator every 6-12 months, or when it becomes visibly worn or stretched.
Conclusion
Changing the belt on your Shark Navigator is a simple and affordable task that can extend the life of your vacuum cleaner. By following the step-by-step instructions provided in this guide, you can easily replace the belt and keep your Shark Navigator running smoothly for years to come.
Don’t let a worn-out belt derail your cleaning routine; take control and keep your vacuum in top condition.